The following text serves as a step-by-step instruction for installing and configuring all the necessary components for the connection of R with the Exasol Community Edition in a Windows environment. The blog entry is based on a webinar from May 13, 2016. If you are already using some of the components, you can simply skip the respective step of the installation.
R and RStudio
At first, R needs to be installed. You can find the latest version for example here: https://cran.uni-muenster.de/. You can keep the default settings in the installation. R comes with a small IDE which is, however, rather sparsely equipped. Therefore it is recommended to use an independent IDE. RStudio is currently the best choice for most use cases. The installer can be downloaded here: https://www.rstudio.com/products/rstudio/download/.
When installing RStudio, the connection to R will be established automatically. If after starting RStudio there is a starting message from R in the console as well as a prompt with an “>”, then RStudio is ready. Before we continue with RStudio, a few more components need to be installed.
Exasol Free Edition
The Exasol Free Edition is delivered as virtual machine (VM). A virtualization software such as the VirtualBox that Oracle offers for free is required for starting it. It can be downloaded here: https://www.virtualbox.org/wiki/Downloads. Take the Virtual Box for Windows hosts under VirtualBox platform packages.
After the VirtualBox has been installed, the Exasol Community Edition needs to be downloaded. It can be found here: https://www.exasol.com/portal/display/DOWNLOAD/Free+Trial. Then the VM needs to be imported into the VirtualBox. To do this, open the VirtualBox, click File Import Appliance and select the Exasol Community Edition. It can usually be found in the default download directory of the web browser used to download the Exasol Community Edition. The import may take a few minutes.
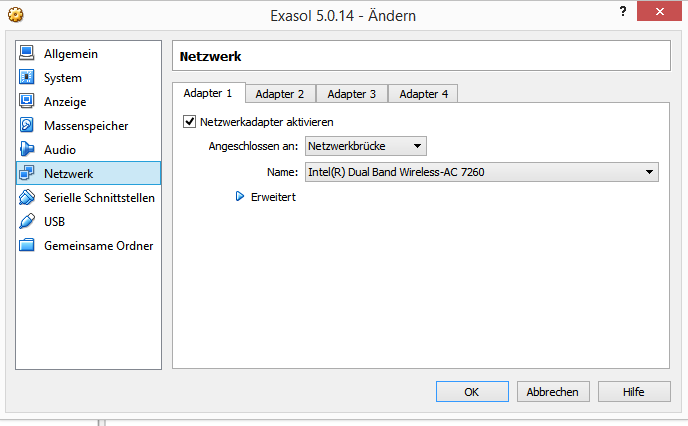
After the import is done, there is one setting that needs to be changed. Select the Exasol in the VirtualBox so that it is highlighted in blue and then click on Settings.
In the pop-up window click on Network and for Attached to select Bridged Adapter. Additionally, tick the checkbox Enable Network Adapter and confirm with OK.
Screenshot
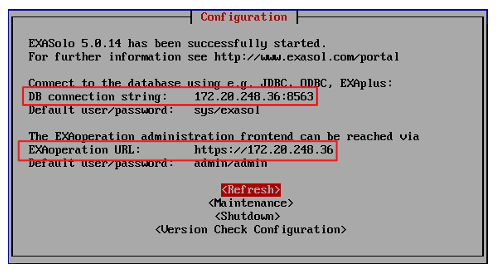
Now the Exasol can be booted with the button Show. A window will open which contains two IP addresses. The first one (DB connection string) is necessary for connecting with R. The second (EXAoperation URL) is needed to reach the Exasol administration surface.
Screenshot
On this surface, R packages can be installed in the R instances on the Exasol clusters.
For this, copy and paste the IP into a web browser and enter the login data User: admin / Password: admin. If a browser notification appears, saying that the requested page is not secure, you need to add a security exception for it.
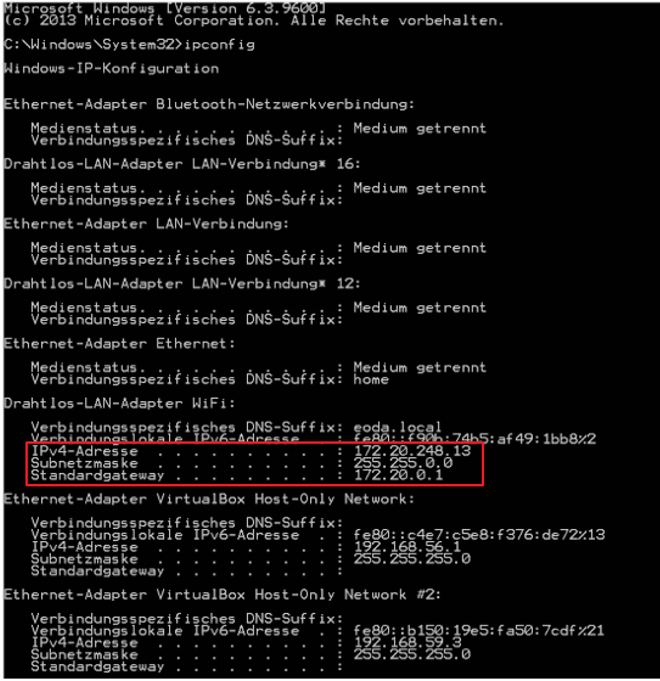
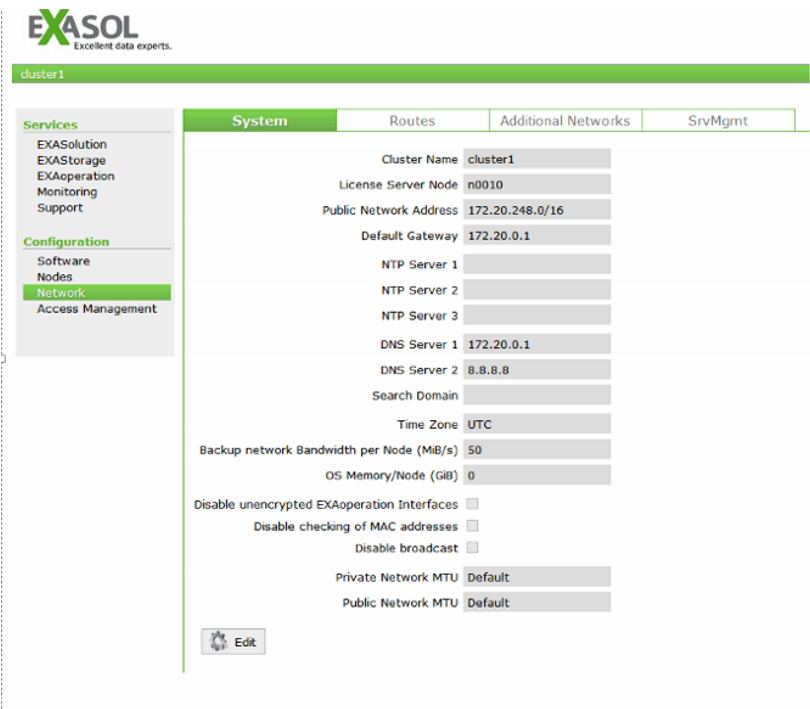
At first, the network settings need to be adjusted. Therefore, click on Network and then on System in order to make the following changes. To receive the necessary information enter ipconfig into the Windows command line. Screenshots 4 and 5 show the information required for the transfer.
- Public Network Address: For this you need the entry within the red frame (cf. screenshot 4) in the ipconfig output. The last digits (in this case 13) have to be replaced by 0. The number following the “/” is determined by the subnet mask (Subnetzmaske): If the subnet mask is 255.255.0.0, the number following the “/” is 16 like in our example. If the subnet mask is 255.255.255.0, the number is 24.
- Default Gateway: Here you need the numbers of the Standardgateway from the ipconfig output.
- DNS Server 1: The same as for the default gateway.
- DNS Server 2: Use the DNS IP of Google as backup: 8.8.8.8.
Screenshot 4
Screenshot 5
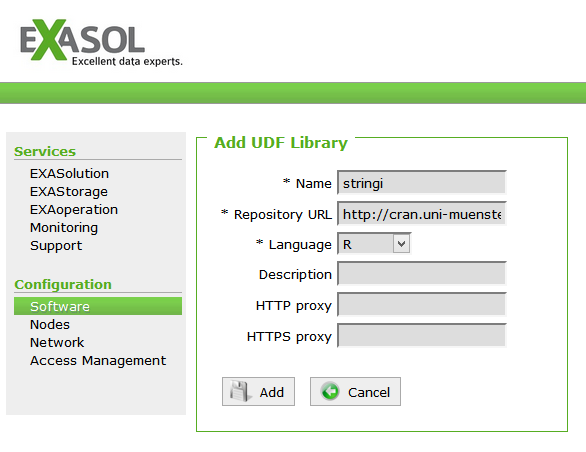
When the network settings have been adjusted, we continue with the administration surface. Go to Software and then click the Add button under UDF Libraries.
Screenshot 6

Enter the name of the package to be installed as well as the repository from which the package is to be installed. It is important to use the http version instead of the https version (in our example: http://cran.uni-muenster.de). Otherwise the installation will fail. Set the language to R and click on Add. Currently, you can only use packages which are based on R version 3.0.2 and below.
Screenshot 7
To finish the installation, select the package with the radio button and click Install. If the State has changed to Installed, the installation was successful.
In order to establish a connection between R and Exasol, we also need an ODBC driver. It can be downloaded from https://www.exasol.com/portal/display/DOWNLOAD/Version+5.0.14. Choose either the installer EXASolution_ODBC-5.0.14-x86.msi for 32-bit architectures or EXASolution_ODBC-5.0.14-x86_64.msi for 64-bit architectures and start the installation by double-clicking on it.
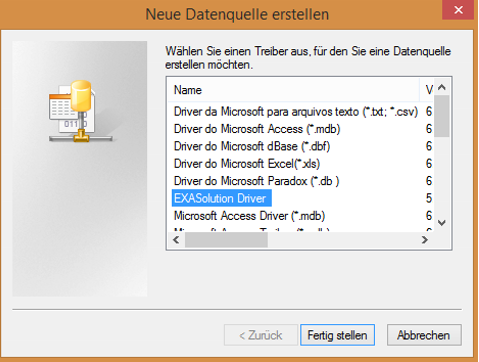
When the installation is finished, open the Control Panel open Administrative Tools and click on the ODBC in the 32-bit or 64-bit version (depending on your system). Click on Add and select the EXASolution Driver.
Screenshot 8
When configuring the driver, you have to enter the username and password as well as the IP of the Exasol. You can find the information in the window of the Exasol VM (cf. screenshot 3).
Screenshot 9
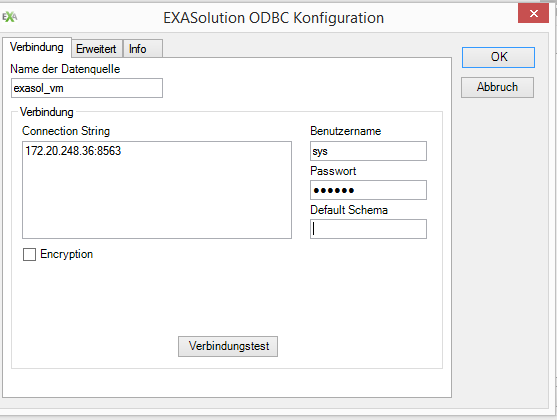
The name of the data source is freely selectable. However, it should be written down because it is needed later on for the connection to R.
Redis
Redis is a small key-value database for interchanging data objects of different languages (R, Python, Lua etc.) via the network. It is a perfect addition for the Exasol R combination because data mining models or functions can thus be distributed among network clusters.
First, you need to download and install the installer, which can be found here: https://github.com/MSOpenTech/redis/releases.
The port number that is given in the installation should not be changed. After Redis has been installed, open the respective folder (probably C:\Programm Files\Redis) and start it via double-clicking on redis-server.exe.
Configuring R and testing the connection
Firstly, all the necessary packages have to be installed. Apart from the packages that establish a connection to the Exasol and Redis, we also need rpart, stringi and partykit for the following demo.
|
1
2
|
# Zu installierende Pakete festlegen…
pkg
|
When all packages have been installed and loaded, the connection to the Exasol and Redis can be tested. For the connection to Redis, you need to enter the IP of the computer on which Redis operates (cf. IPv4-Adresse in screenshot 4). Now, an ODBC connection object is created, which is used for all database operations. The argument contains the name that was entered during the configuration of the ODBC connection (cf. screenshot 9).
|
1
2
|
# Erstellen des Verbindungsobjekts
con
|
When the installation and configuration have been completed, the R / Exasol connection can be used for data mining, machine learning or other analysis methods. One example with executable code can be found in the next article. The following text serves as a step-by-step instruction for installing and configuring all the necessary components for the connection of R with the Exasol Community Edition in a Windows environment. The blog entry is based on a webinar from May 13, 2016. If you are already using some of the components, you can simply skip the respective step of the installation.
R and RStudio
At first, R needs to be installed. You can find the latest version for example here. You can keep the default settings in the installation. R comes with a small IDE which is, however, rather sparsely equipped. Therefore it is recommended to use an independent IDE. RStudio is currently the best choice for most use cases. The installer can be downloaded here.
When installing RStudio, the connection to R will be established automatically. If after starting RStudio there is a starting message from R in the console as well as a prompt with an “>”, then RStudio is ready. Before we continue with RStudio, a few more components need to be installed.
Exasol Free Edition
The Exasol Free Edition is delivered as virtual machine (VM). A virtualization software such as the VirtualBox that Oracle offers for free is required for starting it. It can be downloaded here: https://www.virtualbox.org/wiki/Downloads. Take the Virtual Box for Windows hosts under VirtualBox platform packages.
After the VirtualBox has been installed, the Exasol Community Edition needs to be downloaded. It can be found here: https://www.exasol.com/portal/display/DOWNLOAD/Free+Trial. Then the VM needs to be imported into the VirtualBox. To do this, open the VirtualBox, click File Import Appliance and select the Exasol Community Edition. It can usually be found in the default download directory of the web browser used to download the Exasol Community Edition. The import may take a few minutes.
After the import is done, there is one setting that needs to be changed. Select the Exasol in the VirtualBox so that it is highlighted in blue and then click on Settings.
In the pop-up window click on Network and for Attached to select Bridged Adapter. Additionally, tick the checkbox Enable Network Adapter and confirm with OK.
Now the Exasol can be booted with the button Show. A window will open which contains two IP addresses. The first one (DB connection string) is necessary for connecting with R. The second (EXAoperation URL) is needed to reach the Exasol administration surface.
On this surface, R packages can be installed in the R instances on the Exasol clusters.
For this, copy and paste the IP into a web browser and enter the login data User: admin / Password: admin. If a browser notification appears, saying that the requested page is not secure, you need to add a security exception for it.
At first, the network settings need to be adjusted. Therefore, click on Network and then on System in order to make the following changes. To receive the necessary information enter ipconfig into the Windows command line. Screenshots 4 and 5 show the information required for the transfer.
- Public Network Address: For this you need the entry within the red frame (cf. screenshot 4) in the ipconfig output. The last digits (in this case 13) have to be replaced by 0. The number following the “/” is determined by the subnet mask (Subnetzmaske): If the subnet mask is 255.255.0.0, the number following the “/” is 16 like in our example. If the subnet mask is 255.255.255.0, the number is 24.
- Default Gateway: Here you need the numbers of the Standardgateway from the ipconfig output.
- DNS Server 1: The same as for the default gateway.
- DNS Server 2: Use the DNS IP of Google as backup: 8.8.8.8
When the network settings have been adjusted, we continue with the administration surface. Go to Software and then click the Add button under UDF Libraries.
Enter the name of the package to be installed as well as the repository from which the package is to be installed. It is important to use the http version instead of the https version (in our example: http://cran.uni-muenster.de). Otherwise the installation will fail. Set the language to R and click on Add. Currently, you can only use packages which are based on R version 3.0.2 and below.
To finish the installation, select the package with the radio button and click Install. If the State has changed to Installed, the installation was successful.
In order to establish a connection between R and Exasol, we also need an ODBC driver. It can be downloaded from https://www.exasol.com/portal/display/DOWNLOAD/Version+5.0.14. Choose either the installer EXASolution_ODBC-5.0.14-x86.msi for 32-bit architectures or EXASolution_ODBC-5.0.14-x86_64.msi for 64-bit architectures and start the installation by double-clicking on it.
When the installation is finished, open the Control Panel open Administrative Tools and click on the ODBC in the 32-bit or 64-bit version (depending on your system). Click on Add and select the EXASolution Driver.
When configuring the driver, you have to enter the username and password as well as the IP of the Exasol. You can find the information in the window of the Exasol VM (cf. screenshot 3).
The name of the data source is freely selectable. However, it should be written down because it is needed later on for the connection to R.
Redis
Redis is a small key-value database for interchanging data objects of different languages (R, Python, Lua etc.) via the network. It is a perfect addition for the Exasol R combination because data mining models or functions can thus be distributed among network clusters.
First, you need to download and install the installer, which can be found here: https://github.com/MSOpenTech/redis/releases.
The port number that is given in the installation should not be changed. After Redis has been installed, open the respective folder (probably C:\Programm Files\Redis) and start it via double-clicking on redis-server.exe.
Configuring R and testing the connection
Firstly, all the necessary packages have to be installed. Apart from the packages that establish a connection to the Exasol and Redis, we also need rpart, stringi and partykit for the following demo.
|
1
2
|
# Zu installierende Pakete festlegen…
pkg
|
When all packages have been installed and loaded, the connection to the Exasol and Redis can be tested. For the connection to Redis, you need to enter the IP of the computer on which Redis operates (cf. IPv4-Adresse in screenshot 4). Now, an ODBC connection object is created, which is used for all database operations. The argument contains the name that was entered during the configuration of the ODBC connection (cf. screenshot 9).
|
1
2
|
# Erstellen des Verbindungsobjekts
con
|
When the installation and configuration have been completed, the R / Exasol connection can be used for data mining, machine learning or other analysis methods. One example with executable code can be found in the next article.